An OAuth 1.0 handshake example and library
If you grew up in the '80s or '90s, your first experience with a computer
was probably a single-user type. You turn on the computer and you have full
access to everything that's loaded on it. That's the way my first Commodore
64 worked, and the way DOS, Windows and MAC computers worked until fairly
recently. It was reasonable to assume that if you had physical access to
the computer, you were allowed to access any applications or files stored on
it.
The earliest computers, though, didn't work that way. They were expensive
behemoths that, in order to justify their expense, needed to support multiple
users concurrently. That also meant that some users would have access to
some applications and files and others would have different access — and
that they would even need to share amongst one another. The process of
determining which user was which is referred to as authentication and
the process of determining what each user had access to as authorization.
Authentication hasn't changed much since the earliest computers — each
user was given a unique login name which was associated with a shared
secret (shared between the user and the computer) called a password.
Resources are associated with a login and anybody who can produce the password
has full access to its resources. There are variations such as two-factor
authentication where a user must provide not only a password, but a
token value from a smartcard which changes every few minutes or certificate
based authentication where a user provides a zero-knowledge proof
of possession of a private key, but they all boil down to shared secrets.
As the computing world became more and more networked through the 90's and the beginning of the 21st century, authentication started to come back into style. Now, we have massively distributed applications like Facebook and GMail that must distinguish one user from another before granting access to data which they store on behalf of the user. Recent versions of Windows and Mac OS/X even assume that the computer will have multiple users and (at least by default, unless you disable it) prompt for a username and password when they're switched on.
Oauth is a relatively new spin on authentication. It came up as a way to get around the "mashup" problem - a lot of websites store data on behalf of their users, and a lot of other subsidiary websites can perform useful functions on that data for their users. Oauth offers something of an SSO (single-sign on) scheme for the distributed web, allowing users to pick and choose which data to allow different web sites to share. The whole idea behind OAuth is that the application using the data has a limited view of the data. For instance, I use GMail pretty much exclusively these days. Before Oauth, if I wanted to use a third-party calendar organizer application that integrated with GMail, I'd have to give that third-party application my username and password so that it could get at my calendar and add and remove appointments. Unfortunately (for me), that same application would also have access to my e-mail inbox. I have to trust it to only do what it promised it would do.
In this article, I'll walk through an OAuth 1.0 handshake, byte-by-byte. Along the way, I'll develop, incrementally, a mini-oauth "library". The code is in Java but I've avoided, as much as possible, any pre-packaged Java solutions so as to make it obvious what's going on at each step. Code reuse is great when you're maintaining software, but in my experience, not so hot when you're trying to learn it. When I was originally trying to make sense of Oauth, I was stymied by the fact that every resource out there demonstrated external libraries (that themselves depended on other external libraries!)
The only two exceptions — where I did go ahead and reuse somebody else's code — are the pre-packaged SSL socket and the pre-packaged HMAC message authenticator. If you're interested in a detailed walk-through of both topics, I'll refer you to my book Implementing SSL/TLS using Cryptography and PKI where I present both in complete detail. I'll give a brief overview of HMAC here, but you don't really need to completely understand SSL or HMAC to understand the OAuth flow. I'll assume you're familiar with the low-level details of HTTP, so when I use terminology like "HTTP GET" or "Response Header", you know what I'm talking about. OAuth 1.0 is rigorously specified in RFC 5849.
If you want to access your own data, you supply a username and a password to
the service provider site that hosts the data on your behalf. The
explicit goal of OAuth is to allow you to authorize a third party access to
that data without providing it your user name and password. As it
turns out, this isn't actually a new problem for web sites. Since HTTP is
a "stateless" protocol (that is, it's designed around using a new socket
connection for each page request), it's a web standard
to authenticate a user by checking the password value and then associating
that authenticated status to a persistent session, identified by a
unique session ID. That session id is passed by the user's browser
to the service provider as part of each transaction; the logged-in status
is associated, on the service provider side, with the session ID.
This suggests a simple solution to the OAuth problem — have the user authenticate to the service provider site, get a session ID, and pass that session ID back to the consumer site, which can then take ownership of the session ID and act as the logged-in user.
Although it would work, this naive approach is somewhat limiting. Since the
service provider has an obligation to protect their user's sensitive data,
it would be ideal that they be made aware of who's getting access to what. In
this scheme, the consumer looks just like the user to them; they have no way
of keeping track of which third parties are accessing the data that they're
responsible for protecting. Additionally, session ID's are optimized for
interactive web users, not third party applications. They typically have
relatively short timeout periods, and this approach would result in the user
having to reauthenticate (on behalf of the site that they're actually
interacting with). Then there's the problem of actually getting the session
ID to the site to begin with. Session ID's are normally stored in cookies
and for privacy reasons, browsers deliberately make it difficult for one site
to read another's cookies. What you really want is a special kind of session
ID which is long-lasting, associated to a specific consumer site, and
can easily be transferred, but is only useful to the consumer site.
OAuth introduces a couple of extra steps and tokens to the authentication
process to solve these problems. First of all, consumer sites (those that
want to obtain access to user's data in the service provider site) must
pre-register and obtain a consumer key and a consumer secret.
The consumer site is then responsible for requesting an access
token from the service provider. The consumer site hands that access
token back to the user, which then explicitly authorizes it with the service
provider. In effect, the user is saying, "Yes, allow the bearer of this
access token access to my data." At this point, the user can also see exactly
what information the consumer site is proposing to access, and can decide
whether or not to trust it or not.
Figure 1, below, illustrates the end-to-end OAuth login flow. At the completion of the flow, the consumer has an access token and a token secret that it can use to retrieve any of the data that the resource owner has authorized it to, but it never saw the resource owner's actual credentials. Presumedly, the consumer application authenticates the user itself before using this token — this is why OAuth by itself isn't a true and complete SSO solution. A real "single-sign on" would share identity providers between the consumer and the service provider (for example, the way OpenID or SAML do). The arrows are color coded to distinguish the different uses of HTTP; green arrows indicate an interaction between a web server and a web browser (i.e. the "normal" way) and blue arrows indicate REST-like API calls that happen to be implemented using HTTP but which browsers don't normally make.
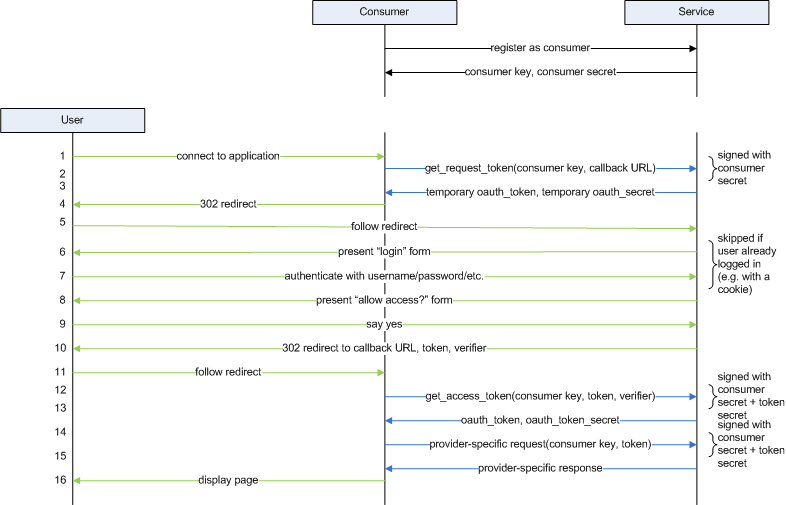
Figure 1: OAuth flow
As you can see, it's a relatively complex flow. Nothing sensitive is returned until the 15th step, and only then if a token is provided that was generated by the service provider, signed with the corresponding token secret. Working backwards, then, a theoretical attacker's goal is to get his hands on these two pieces of data. Notice that while the consumer never sees the user name and password, the user never sees the access token! This guards against web redirect attacks that might be used to trick a user into exposing this value to a malicious attacker.
This token/secret combination is only provided in response to an HTTP GET to the "get_access_token" URL, which will respond with an error unless supplied with a temporary token that the service provider both generated and authorized with the resource owner (the user).
The "allow access" form, step 8, protects the user against a rogue consumer. After all, the process for obtaining a consumer key/consumer secret is totally anonymous and automated in most cases. The "allow access" form identifies, by name, the consumer which is requesting access to the user's data. Since this form is presented and filled out entirely between the user and the service provider, the user can decide, based on the name of the consumer, whether or not to allow this access. You've almost certainly seen this if you've used facebook for any duration of time — a friend will send you a request to add your birthday to their birthday calendar, and you'll be presented with a form like the one shown in figure 2:
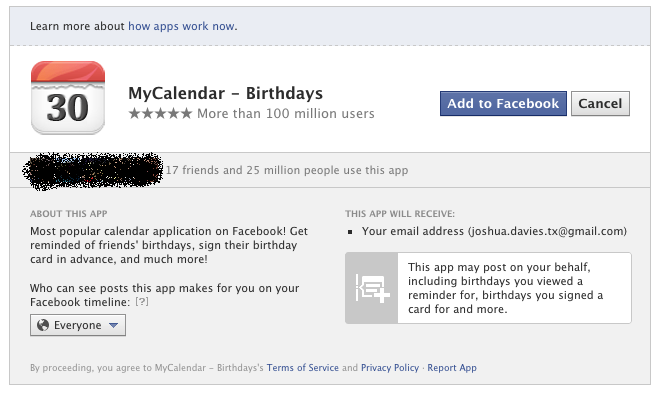
Figure 2: Facebook's Birthday Calendar Invitation
This tells you the name of the app, and what it plans to do with your data.
Notice in figure 1 that there are five arrows pointing back to the user's browser, two of which are 302 redirects (one of which is optional). That means that, to complete an OAuth handshake, the user will be presented with up to two login pages before the handshake is over. The first will be a login page which may or may not be styled differently than the normal application login. For example, figure 3 shows the login page that Google will present if the user's browser is not already logged in to GMail:
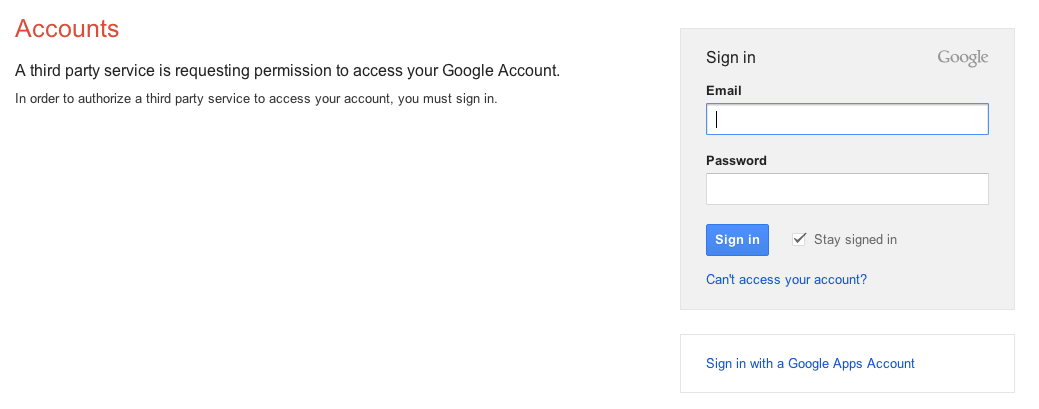
Figure 3: GMail OAuth login page
The second page, which will always be shown, is the "authorize this application" page (figure 4). Before a token is issued to a consumer application, the user (the actual resource owner) has to OK it with the service provider. The consumer application doesn't get any chance to influence this - the user either OKs this temporary token or doesn't. Since this is handled entirely between the user and the service provider, there's no way for an attacker to trick the user into allowing access.

Figure 4: GMail OAuth permission page
In figure 4, the application name is the defaulted "119097939021.apps.googleusercontent.com" placeholder name. When you register your app, you can, of course, provide a more meaningful name like "Farmville" or "CalendarManager".
I'll now walk through a complete OAuth handshake using Google's GMail service as an example. In this example, Google is the Service Provider from figure 1, GMail users are the user, and my fictitious calendar manager application is the consumer. You can register a new app (i.e. consumer site) for free at Google's developer site; part of this registration gives you the consumer key and consumer secret that identify your app to Google and your users. For this example, I'll pretend that I got the consumer key "CalendarConsumer12345" and the consumer secret "password456". Real consumer key/secret pairs are a tad more opaque than these.Now, with the app registered and set up, users navigate to my calendar app page. Before I can retrieve their calendar information, I (the consumer application) have to complete an OAuth handshake with Google, the service provider.
The first automated step is the request for a temporary token. This goes from the consumer to the service provider, and is completely transparent to the actual user, who has at this point just asked to see the consumer application's startup page.
GET /accounts/OAuthGetRequestToken? scope=https%3A%2F%2Fmail.google.com%2Fmail%2Ffeed%2Fatom HTTP/1.1 Host: www.google.com Connection: Close Authorization: OAuth oauth_consumer_key="CalendarConsumer12345", oauth_nonce="nonceabc123", oauth_timestamp="1340653420", oauth_signature_method="HMAC-SHA1", oauth_signature="nPPh4sLZaCrSAD2moyG6%2Bp8lPuM%3D", oauth_version="1.0", oauth_callback="http%3A%2F%2Fwww.myapp.com%2Flandingpage.php" HTTP/1.1 200 OK Content-Type: text/plain; charset=UTF-8 Date: Tue, 05 Jun 2012 22:08:17 GMT Expires: Tue, 05 Jun 2012 22:08:17 GMT Cache-Control: private, max-age=0 X-Content-Type-Options: nosniff X-XSS-Protection: 1; mode=block Content-Length: 118 Server: GSE Connection: close oauth_token=4%2Fho30mS33NWNU_DI4G2bMou3fsfpC& oauth_token_secret=kK6gBXVtqjeQaC8-PxHI4Eh1& oauth_callback_confirmed=true |

|
/accounts/OAuthGetRequestToken?scope=https%3A%2F%2Fmail.google.com%2Fmail%2Ffeed%2Fatom
is specific to Google apps. Each OAuth provider specifies their own URL
for getting request tokens (and, later in the flow, getting access tokens),
and these actual URLs are documented in their setup process. The
scope parameter (which is also Google-specific) tells Google
exactly what the consumer site is interested in accessing.
The authorization header is the actual OAuth part, and tells Google what consumer is requesting the temporary token, but does not say anything about the user (in fact, the consumer doesn't yet know who the user is and actually may never know!):
Authorization: OAuth oauth_consumer_key="CalendarConsumer12345",
  oauth_nonce="nonceabc123",
  oauth_timestamp="1340653420",
  oauth_signature_method="HMAC-SHA1",
  oauth_signature="nPPh4sLZaCrSAD2moyG6%2Bp8lPuM%3D",
  oauth_version="1.0",
  oauth_callback="http%3A%2F%2Fwww.myapp.com%2Flandingpage.php"
The Authorization header is a comma-separated collection of name-value pairs. I've formatted these examples with line breaks for readability, but these line breaks are not present in the actual request. Within these name-value pairs, the consumer key which identifies the application is passed in, along with the signature. The rest of the data is mostly informational — signature method and OAuth version, for example — the nonce and the timestamp are provided to prevent replay attacks. The last bit of information is the callback, which, as you see from Figure 5, will be reused at a much later point in the flow.
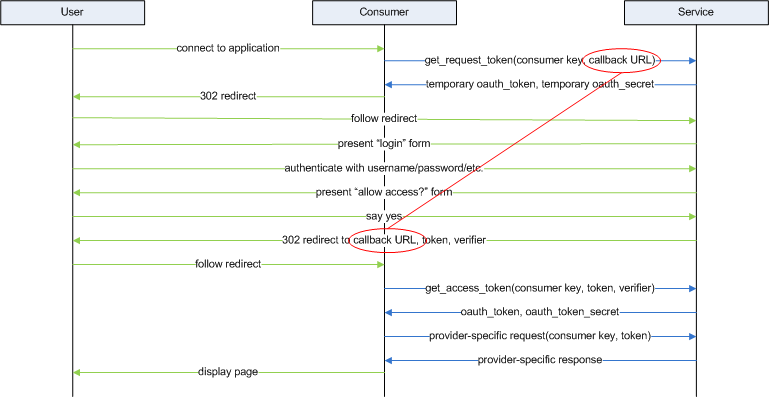
Figure 5: Callback URL
The oauth_signature part of the header is an HMAC signature.
If you're familiar at all with HMAC, you know that it's a cryptographically
secure (i.e. non-reversible) combination of a specific string along with a
shared secret. So, in order to generate and verify one, the precise contents
of the input and secret must be part of the OAuth specification.
The signature string is concatenated from the request URL, the OAuth parameters,
and the additional parameters (in this instance, Google's "scope" parameter
which is not part of the OAuth specification). The concatenated, URLEncoded
signature string is:
GET&https%3A%2F%2Fwww.google.com%2Faccounts%2FOAuthGetRequestToken&
oauth_callback%3Dhttp%3A%2F%2Fwww.myapp.com%2Flandingpage.php%26
oauth_consumer_key%3DCalendarConsumer12345%26oauth_nonce%3Dnonceabc123%26
oauth_signature_method%3DHMAC-SHA1%26oauth_timestamp%3D1340653420%26
oauth_version%3D1.0%26scope%3Dhttps%253A%252F%252Fmail.google.com%252F
mail%252Ffeed%252Fatom
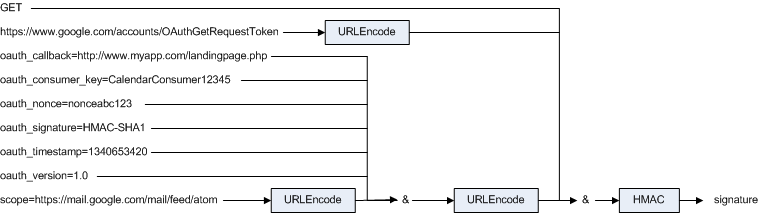
Figure 6: Constructing the Signature String
Notice that the sorted parameters are themselves URL encoded, so that although the literal character '&' separates the method GET from the (also URL encoded) host and the parameters, they themselves are separated by the %26 URL-encoded representation of the ampersand character '&'. The signature itself is the 160-bit SHA-1 HMAC of the signature string, computed using the consumer secret as the shared key. The specification states that the shared HMAC key is the consumer secret, the "&" separator, and the token secret (or the empty string if no token secret has been established yet). Since this is the first exchange, no token secret has been established, so the actual shared HMAC key is:
password456&Notice the ampersand on the end — this is required, even if there's nothing after it. The generated signature, Base64 encoded, is then:
nPPh4sLZaCrSAD2moyG6+p8lPuM=You can see this value in the OAuth header. The signature is URL encoded, so it becomes:
nPPh4sLZaCrSAD2moyG6%2Bp8lPuM%3D —
since an SHA-1
signature is always exactly 20 bytes and 20 is not an even multiple of 3
(leaving two bytes left over), the OAuth-generated signature will always have
a trailing "=" sign and thus always need to be URL Encoded.
Strictly speaking, it wasn't necessary for the OAuth specification to mandate that the signature be URL encoded this way. The only non-printable characters in a Base64-encoded string are '/', '+' and '=', none of which cause problems in HTTP header values (the HTTP cookie header specification, for example, permits unencoded Base64 strings). Apparently the authors figured "better safe than sorry".
Generating this signature is the most complex part of OAuth 1.0. The utility class in listing 1 demonstrates creating an OAuth header for a fixed host, path, consumer key and consumer secret.
import java.util.Collections;
import java.util.List;
import java.util.ArrayList;
import java.io.IOException;
import java.util.Date;
// For the HMAC
import java.security.SignatureException;
import javax.crypto.Mac;
import javax.crypto.spec.SecretKeySpec;

public class OAuthAuthenticator
{
  private String host;
  private String path;
  private String consumerKey;
  private String consumerSecret;

  public OAuthAuthenticator( String host,
                             String path,
                             String consumerKey,
                             String consumerSecret )
  {
    this.host = host;
    this.path = path;
    this.consumerKey = consumerKey;
    this.consumerSecret = consumerSecret;
  }

  public String generateOauthHeader( String method,
                                     String callback,
                                     String[] additionalParameters )
  {
    long timestamp = new Date().getTime() / 1000;
    // XXX this should be different than the timestamp, but
    // good enough for demonstration purposes
    String nonce = Long.toString( timestamp );

    ArrayList< String > parameters = new ArrayList< String >();
    parameters.add( "oauth_consumer_key=" + consumerKey );
    parameters.add( "oauth_nonce=" + nonce );
    parameters.add( "oauth_signature_method=HMAC-SHA1" );
    parameters.add( "oauth_timestamp=" + timestamp );
    // Note this is URL encoded twice
    parameters.add( "oauth_callback=" + URLEncoder.urlEncode( callback ) );
    parameters.add( "oauth_version=1.0" );

    for ( String additionalParameter : additionalParameters )
    {
      parameters.add( additionalParameter );
    }

    Collections.sort( parameters );

    StringBuffer parametersList = new StringBuffer();

    for ( int i = 0; i < parameters.size(); i++ )
    {
      parametersList.append( ( ( i > 0 ) ? "&" : "" ) + parameters.get( i ) );
    }

    String signatureString =
      method + "&" +
      URLEncoder.urlEncode( "https://" + host + path ) + "&" +
      URLEncoder.urlEncode( parametersList.toString() );

    String signature = null;

    try
    {
      SecretKeySpec signingKey = new SecretKeySpec(
        ( consumerSecret + "&" ).getBytes(), "HmacSHA1" );
      Mac mac = Mac.getInstance( "HmacSHA1" );
      mac.init( signingKey );
      byte[] rawHMAC = mac.doFinal( signatureString.getBytes() );
      signature = Base64.encodeBytes( rawHMAC );
    }
    catch ( Exception e )
    {
      System.err.println( "Unable to append signature" );
      System.exit( 0 );
    }

    System.out.println( signature );

    String authorizationLine =
      "Authorization: OAuth " +
      "oauth_consumer_key=\"" + consumerKey + "\", " +
      "oauth_nonce=\"" + nonce + "\", " +
      "oauth_timestamp=\"" + timestamp + "\", " +
      "oauth_signature_method=\"HMAC-SHA1\", " +
      "oauth_signature=\"" + URLEncoder.urlEncode( signature ) + "\", " +
      "oauth_version=\"1.0\"";
    authorizationLine += ", oauth_callback=\"" +
      URLEncoder.urlEncode( callback ) + "\"";

    return authorizationLine;
  }
}
Listing 1: OAuth authenticator
Here, the method generateOauthHeader takes in all of the
parameters that will vary from one oauth header to the next, but the fixed
parameters are in the constructor so that an instance can be reused for
multiple calls. First, it generates all of the parameters that are required
in the oauth header and sorts them into the signatureString and then signs
that using both the consumer secret and the (optional) token secret. The
token secret is optional because, at this point, there is no token
secret (nor token) — we're requesting one. In the next step, the token
secret will be part of the HMAC key so that the receiver can validate that the
requester had access to both without requiring them to be transmitted at any
point.
Listing 2 illustrates how you might use this to generate and submit a request for a temporary token. Here I've gone ahead and directly created a socket connection, but for robustness, you might want to use something a bit more high-level like HttpClient.
    String host = "www.google.com";
    String path = "/accounts/OAuthGetRequestToken";
    String consumerKey = "CalendarConsumer123";
    String consumerSecret = "password456";
    String redirectUrl = "https://accounts.google.com/OAuthAuthorizeToken";
    String oauthCallback = "https://my.calendar.app/callback";
    String[] additionalParameters = {
      "scope=http%3A%2F%2Fmail.google.com%2Fmail%2Ffeed%2Fatom"
    };

    OAuthAuthenticator authenticator = new OAuthAuthenticator(
      host, path, consumerKey, consumerSecret );

    Socket connection =
      SSLSocketFactory.getDefault().createSocket( host, 443 );
    BufferedReader in = new BufferedReader(
      new InputStreamReader( connection.getInputStream() ) );
    OutputStream out = connection.getOutputStream();
    String requestLine = "GET " + path;
    if ( additionalParameters.length > 0 )
    {
      for ( int i = 0; i < additionalParameters.length; i++ )
      {
        requestLine += ( ( i == 0 ) ? "?" : "&" ) +
          additionalParameters[ i ];
      }
    }
    requestLine += " HTTP/1.1";
    out.write( ( requestLine + "\r\n" ).getBytes() );
    out.write( ( "Host: " + host + "\r\n" ).getBytes() );
    out.write( ( "Connection: Close\r\n" ).getBytes() );
    String oauthHeader = authenticator.generateOauthHeader(
      "GET", oauthCallback, additionalParameters );
    out.write( ( oauthHeader + "\r\n" ).getBytes() );
    out.write( "\r\n".getBytes() );

    String responseHeader = in.readLine();
    String[] responseHeaderComponents = responseHeader.split( " " );
    if ( responseHeaderComponents.length < 3 )
    {
      // XXX you probably want to do more robust error handling here...
      throw new Exception( "Malformed server response: " + responseHeader );
    }

    if ( !( "200".equals( responseHeaderComponents[ 1 ] ) ) )
    {
      System.err.println( responseHeader );
      throw new Exception( responseHeader );
    }

    // Just skip the headers, don't care.
    while ( in.readLine().trim().length() > 0 );

    String responseLine = in.readLine();
    String[] responseNvPairs = responseLine.split( "&" );
    for ( String responseNvPair : responseNvPairs )
    {
      if ( responseNvPair.startsWith( "oauth_token_secret=" ) )
      {
        // TODO store the oauth_token_secret in the session for
        // verification later on
        System.out.println( responseNvPair );
      }
      if ( responseNvPair.startsWith( "oauth_token=" ) )
      {
        redirectUrl += "?" + responseNvPair;
      }
    }
Listing 2: get temporary token
The two Google URLs that I hardcoded in listing 2 (path and
redirectURL) come from Google's OAuth
specifications; they'll vary from one OAuth provider to the next, but an
OAuth 1.0 compliant implementation must provide these two URL's. The
"additional parameters" are Google's way of specifying exactly what I (the
consumer) am requesting access to — this controls what appears on the
authorization page in step 8.
Now you (the consumer site) have a temporary token and a temporary token secret. These values are
cached by the service provider, along with the provided callback URL for later.
It's now up to the consumer application to redirect the user to the service
provider's authorization page. In the case of GMail (and any other Google
app), this is https://accounts.google.com/OAuthAuthorizeToken. Of course,
the token to be authorized must be provided as a parameter as well. It's also
worth noting that the authorize token landing page MUST accept GET's, since
it's a browser being redirected, and HTTP doesn't permit (for good reason)
redirects to be POSTs.
The browser will thus be redirected to:
https://accounts.google.com/OAuthAuthorizeToken?oauth_token=4%2FB7qgf0yHjGwOlsiHDY-317rE4ZooThis is a service provider host, and must be, in order for OAuth to work correctly. The token provided in the previous step is provided; the service provider first checks to see if the token is one that it actually handed back. If so, it authenticates the user and warns the user that the authentication is actually on behalf of the "Calendar" application. How it authenticates the user is between it and the user — if the user is already logged in to GMail and has a valid session ID cookie, that will be recognized by Google and the login screen can be safely bypassed. This is not a problem since, at this point, the interaction is entirely between the user and Google. It is important that the user be notified that a third-party application is requesting use of his data and that he explicitly opt-in.
Assuming he does opt in, he'll be redirected back to the consumer application for the final stage of the login process. Where exactly is he redirected? to the callback URL provided in the very first call. This is important, since the callback URL was provided by the consumer key and this can be verified by the signature with the consumer secret which is shared between the consumer and the service provider. If this callback URL were provided in some other way (say, passed as a parameter to OAuthAuthorizeToken), a rogue application could situate itself as a man-in-the-middle and masquerade as the consumer, fooling the user into thinking they were interacting with the legitimate consumer app.
This callback goes to the consumer app, and it gets a couple of extra bits of information appended to it: the OAuth verifier, and the OAuth Token. Why the oauth token? After all, the consumer already has the token, having requested it back in step 2. Well, that's true, but OAuth doesn't make any assumptions about the architecture of the consumer application. Specifically, it doesn't assume that the consumer application has implemented any sort of "session affinity" — in other words, there's no guarantee that the consumer application can correlate the initial "connect to application" (step 1 of figure 1) with the "follow redirect" (step 11). Therefore, the consumer application is passed the value temporary token which it should be exchanging for an actual access token. Note that although there's no assumption of session affinity, the consumer application must still have some means of correlating the access token to be authorized with the associated token secret.
The initial release of OAuth 1.0 left it at that, but opened itself up to a subtle man-in-the-middle attack, so the amended version of the specification includes the "verifier" parameter which is generated by the service provider and validated before allowing the temporary token to be upgraded to a full access token.
So, the consumer isn't quite finished. It must exchange the temporary
token for a legitimate access token. The temporary token can't be used for
real data access; it can just be used to authorize the user. So there's a
final interaction between the consumer application and the service provider.
This time, the consumer issues a get request to
https://www.google.com/accounts/OAuthGetAccessToken. The request has to
be authenticated just like the first one was, but since there's a token secret
established at this point, that must be used as part of the HMAC shared
secret. Since the OAuth authenticator takes additional parameters, modify
it as shown in listing 3:
  public String generateOauthHeader( String method,
                                     String token,
                                     String tokenSecret,
                                     String verifier,
                                     String callback,
                                     String[] additionalParameters )
  {
    long timestamp = new Date().getTime() / 1000;
    // XXX this should be different than the timestamp, but
    // good enough for demonstration purposes
    String nonce = Long.toString( timestamp );

    ArrayList< String > parameters = new ArrayList< String >();
    parameters.add( "oauth_consumer_key=" + consumerKey );
    parameters.add( "oauth_nonce=" + nonce );
    parameters.add( "oauth_signature_method=HMAC-SHA1" );
    parameters.add( "oauth_timestamp=" + timestamp );
    if ( token != null )
    {
      parameters.add( "oauth_token=" + token );
    }
    if ( verifier != null )
    {
      parameters.add( "oauth_verifier=" + verifier );
    }
    if ( callback != null )
    {
      // Note this is URL encoded twice
      parameters.add( "oauth_callback=" + URLEncoder.urlEncode( callback ) );
    }
    parameters.add( "oauth_version=1.0" );

    for ( String additionalParameter : additionalParameters )
    {
      parameters.add( additionalParameter );
    }

    Collections.sort( parameters );

    StringBuffer parametersList = new StringBuffer();

    for ( int i = 0; i < parameters.size(); i++ )
    {
      parametersList.append( ( ( i > 0 ) ? "&" : "" ) + parameters.get( i ) );
    }

    String signatureString =
      method + "&" +
      URLEncoder.urlEncode( "https://" + host + path ) + "&" +
      URLEncoder.urlEncode( parametersList.toString() );

    System.out.println( "Signature string: " + signatureString );

    String signature = null;

    try
    {
      SecretKeySpec signingKey = new SecretKeySpec( ( consumerSecret + "&"
      + ( tokenSecret == null ? "" : tokenSecret )
      ).getBytes(), "HmacSHA1" );
      Mac mac = Mac.getInstance( "HmacSHA1" );
      mac.init( signingKey );
      byte[] rawHMAC = mac.doFinal( signatureString.getBytes() );
      signature = Base64.encodeBytes( rawHMAC );
    }
    catch ( Exception e )
    {
      System.err.println( "Unable to append signature" );
      System.exit( 0 );
    }

    System.out.println( signature );

    String authorizationLine =
      "Authorization: OAuth " +
      "oauth_consumer_key=\"" + consumerKey + "\", " +
      "oauth_nonce=\"" + nonce + "\", " +
      "oauth_timestamp=\"" + timestamp + "\", " +
      "oauth_signature_method=\"HMAC-SHA1\", " +
      "oauth_signature=\"" + URLEncoder.urlEncode( signature ) + "\", " +
      "oauth_version=\"1.0\"";
    if ( token != null )
    {
      authorizationLine += ", oauth_token=\"" + token + "\"";
    }
    if ( verifier != null )
    {
      authorizationLine += ", oauth_verifier=\"" + verifier + "\"";
    }
    if ( callback != null )
    {
      authorizationLine += ", oauth_callback=\"" +
        URLEncoder.urlEncode( callback ) + "\"";
    }

    return authorizationLine;
  }
}
Listing 3: OAuthAuthenticator updated to handle the second phase of authentication
(Note that this refactoring means you have to also modify listing 2 to passnull in for the three new, unused parameters). Using the
OAuthAuthenticator class from listing 3, upgrading the token is actually pretty
straightforward as shown in listing 4:
    String host = args[ 0 ];
    String path = args[ 1 ];
    String consumerKey = args[ 2 ];
    String consumerSecret = args[ 3 ];
    String token = args[ 4 ];
    String tokenSecret = args[ 5 ];
    String verifier = args[ 6 ];

    OAuthAuthenticator authenticator = new OAuthAuthenticator(
      host, path, consumerKey, consumerSecret );

    Socket connection = SSLSocketFactory.getDefault().createSocket( host, 443 );
    InputStream in = connection.getInputStream();
    OutputStream out = connection.getOutputStream();

    out.write( ( "GET " + path + " HTTP/1.1\r\n" ).getBytes() );
    out.write( ( "Host: " + host + "\r\n" ).getBytes() );
    out.write( ( "Connection: Close\r\n" ).getBytes() );
    String oauthHeader = authenticator.generateOauthHeader( "GET", token,
      tokenSecret, verifier, null, new String[ 0 ] );
    out.write( ( oauthHeader + "\r\n" ).getBytes() );
    out.write( "\r\n".getBytes() );
Listing 4: Exchange request token for access token
HTTP/1.1 200 OK Content-Type: text/plain; charset=UTF-8 Date: Fri, 22 Jun 2012 19:47:58 GMT Expires: Fri, 22 Jun 2012 19:47:58 GMT Cache-Control: private, max-age=0 X-Content-Type-Options: nosniff X-XSS-Protection: 1; mode=block Content-Length: 103 Server: GSE Connection: close oauth_token=1%2FsEnpfbwXxCH-a9SexgqU995rQ1rkHX5DtA3I5nrcztM& oauth_token_secret=NqSPuPL65Okpbiij9XL-d6Kx |

|
The signature string in this case is:
GET&https%3A%2F%2Fwww.google.com%2Faccounts%2FOAuthGetAccessToken&
oauth_consumer_key%3DCalendarConsumer123%26oauth_nonce%3D1340394477%26
oauth_signature_method%3DHMAC-SHA1%26oauth_timestamp%3D1340394477%26
oauth_token%3D4%252F48AQBo1yu9NP2YnaTTKtm4N-mPu1%26oauth_verifier%3D
MwmDEyQw-NoACjt_-lTj6_A-%26oauth_version%3D1.0
In the first exchange, the HMAC key was simply the consumer secret, but this time, it's the concatenated consumer secret and the token secret. The response to this is, finally, the actual token and secret (somewhat confusingly called "oauth_token" and "oauth_token_secret", just like the temporary token was). This token can be used to submit actual requests for data, but these must be accompanied by a properly-formatted OAuth authorization header, as built by the OAuthAuthenticator helper class.
How is this better than just providing your username/password to the consumer site, though? After all, if the token/token secret are compromised along with the consumer key, they can be used to access a user's data just like the username/password might have been — the user is still trusting in the security of the consumer site to guard their data. However, in almost all cases, the data access afforded by an oauth token is less than that of the full username/password — if the token were compromised, an attacker might be able to read the user's financial data (bad), but not transfer money out of his bank account (catastrophic). Also, OAuth tokens can be revoked on a per-consumer basis. If one consumer is compromised, the token can be revoked by the user but his own username and password — as well as any tokens he's established with any other consumer sites — will continue to function correctly. Not only that, but if evidence of nefarious activity is identified by the service provider, it will be associated with a specific OAuth token — and can therefore be traced back to the consumer with which it was associated. If a consumer is responsible for too many security breaches, the service provider can choose to revoke their consumer key until they clean up their act — this isn't necessarily an option if the user is sharing their username and password with dozens of consumer sites.
The example in this article was Google specific, but the demonstration applies to any OAuth 1.0-enabled service provider; the only difference will be in the URL endpoints.
OAuth works just fine, and appears to be impervious to subtle attacks — at least, none have been discovered or published since 1.0a was released. However, it's proven to be problematic to implement and get right. In particular, getting the signatures right caused a lot of people a lot of heartburn, and a lot of users questioned whether the "three-legged" authorization protocol was really necessary. As it turns out, it doesn't appear that either is actually needed for proper security, so OAuth 2.0 does away with both. In a future installment of this series, I'll examine an OAuth 2.0 handshake, which is actually a bit simpler in many ways than OAuth 1.0. However, OAuth 1.0 is likely here to stay for quite a while (OAuth 2.0 doesn't even have a final specification yet), so it's worth getting acquainted with its details.
Add a comment:
Completely off-topic or spam comments will be removed at the discretion of the moderator.
You may preserve formatting (e.g. a code sample) by indenting with four spaces preceding the formatted line(s)
Thanka Den
    String[] additionalParameters = {
      "scope=http%3A%2F%2Fmail.google.com%2Fmail%2Ffeed%2Fatom"
    };
This is, of course, very specific to this (toy) implementation.