Using the Chrome Debugger Tools, part 7 - the Resources Tab
The evolution of the world wide web from relatively simple web "pages" to arbitrarily complex web "applications" has been an interesting one. Whereas the early web looked more like a never-ending magazine or newspaper, the persistent trend in web design has been pushing more and more toward web pages which behave like traditional desktop applications. On the one hand, a simple article-style web page (like this blog, for instance), is server-dominant — the content is written, reviewed and published to the site's server but is, for the most part, "frozen" after that point. Every requester sees the same thing. In contrast, web "applications" are more personalized: what each user sees is based on that user's past behavior on the page. However, one of the major design points of the web — and part of its appeal to early adopters — was its "statelessness": each request was independent of any request that came before it. Any form of personalization — even something as mundane as displaying a user's name at the top of each page — needed a way to associate each request with all of those that came before it, from the perspective of a single user. As soon as users and site administrators began to push for more personalization, the need for some form of client-side storage became evident.
Some early web page authors figured out a sneaky way to "trick" web browsers and servers into pretending to be stateful even though the HTTP protocol didn't actually allow for it — they added a unique token to each URL. When the server received a request for a page with such a token, all of the links inside that page were rewritten to include that same token, ensuring that each request could be correlated to the one that came before it, from the perspective of a single user visiting the site one time. This way, the server could play personalization tricks to provide the user with a seamless illusion that the entire visit was part of one long session.
Viewing cookies with the resources tab
Tokens and URL rewriting had their limits, though. For one thing, if the user closed the browser, the token was lost. On the flip side, if the user bookmarked a page with a token in its URL, the state-tracking mechanism built into the server could end up being confused when a session from possibly six months ago appeared to have been resumed. The first "full" version of HTTP — HTTP/1.0 — provided site administrators and web page designers with a slightly more robust, but still blunt, tool to correlate clients to page visits: the cookie. In theory, a cookie worked like URL rewriting, but rather than being appended to links, it was tracked in an HTTP header. This way, the browser could automatically manage session tracking on behalf of the user so that the site administrator didn't need to ensure that every link was properly rewritten. Even better, metadata could be associated with each cookie, so the site administrator could declare, for example, that one cookie should disappear when the browser shut down, but another should persist across reboots of the computer.
The origin of the term cookie to mean a piece of data that identifies a particular user is unclear. Folklore has it that it evolved from a comparison to fortune cookies that keep "important" information inside something else.
The Chrome debugger Resources tab helps web app designers keep track of their
application's use of client (browser)-side storage. Although HTML5 provides more modern alternatives
to cookies for long-term storage, cookie management still remains an important part of most web
development.
If you open Example 1,
it will set 5 cookies on your browser (if you have cookies enabled). Don't worry, I won't share
any information with any third parties!
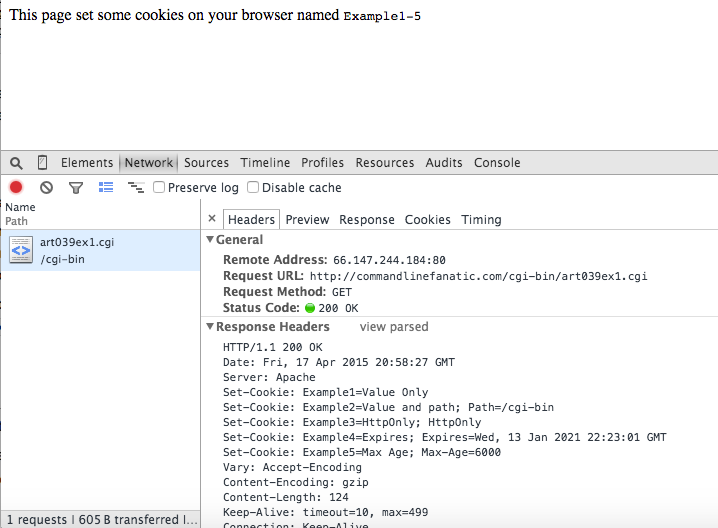
Figure 1: Cookies response headers
As illustrated in figure 1, above, cookies are set by a page through HTTP response headers. Here
I've opened up the Network tab to see the "raw" data. When a web site wants to set
a cookie on a browser, it transmits a Set-Cookie header with the response. The client
is then supposed to remember the text that was associated with that header and transmit it back
whenever (by default) any page in that domain is requested. At a minimum, each cookie has
four attributes associated with it: its name, its value, the domain to which it applies, and
its expiration date. The name and value must be explicitly provided (they're the first two
tokens after Set-Cookie) and are optionally provided by all other attributes. If not explicitly provided, the domain will be defaulted to that of the
sender, and the expiration date will be defaulted to last until the browser is shut down.
The domain value of a cookie tells the browser when it should be sent back to the
server. So, for the cookies in figure 1, since the domain was not specified by the response
header, they will default to commandlinefanatic.com (i.e. the originating domain),
and will be sent back with each request to that domain. Conversely, the expiration date tells
the browser how long to keep the cookie; after the expiration date, the browser should delete the
cookie and stop sending it to the domain.

Figure 2: Cookies view on response
Figure 2 shows how cookies are summarized in the network view. In spite of the many advances that HTML 5 has made in client-side storage, cookies are still an important part of modern web architecture, and Chrome continues to feature them prominently in its web debugger tools.
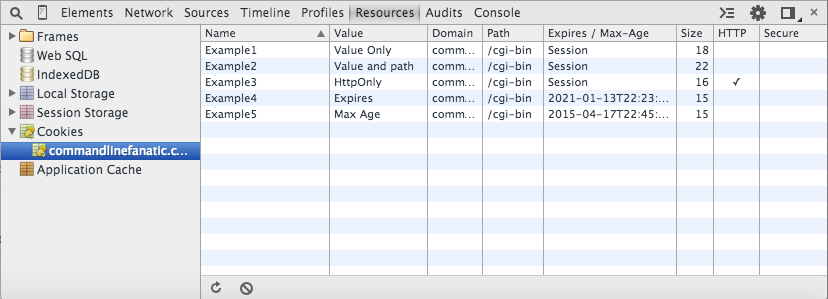
Figure 3: Resources cookie view
If you turn to the resources tab (the subject of this post, after all), you see a
recap of what's shown in the network tab (figure 3). One benefit to the resources view when looking up cookies is that, if you load a page
without the debugger tools open and bring it up it later, the resource view will show you the cookies
that apply to this page — the network view will not show you this unless it was running when
the page is requested. Notice also that in figure 2, the Domain tab is empty,
which indicates that the server didn't narrow the domain. However, in figure 3, the (defaulted) domain for
each cookie is displayed even though it's implied in the network view — the difference is that the resources view is designed to give out
information about persistent storage whereas the network view is geared toward showing you what
happened just now. Notice that the resources tab does allow you to remove cookies, but doesn't
allow you to edit them. If you right-click on the cookies view, you can delete cookies individually,
or remove all the cookies for the given domain.
In essence, Chrome has just associated those five cookies with the domain commandlinefanatic.com —
every time you make a request to any page in that domain, those cookies will be transmitted as
request headers, shown in figure 4. It's generally up to the server side to interpret those
cookie values meaningfully, although they are accessible to Javascript programs as well.
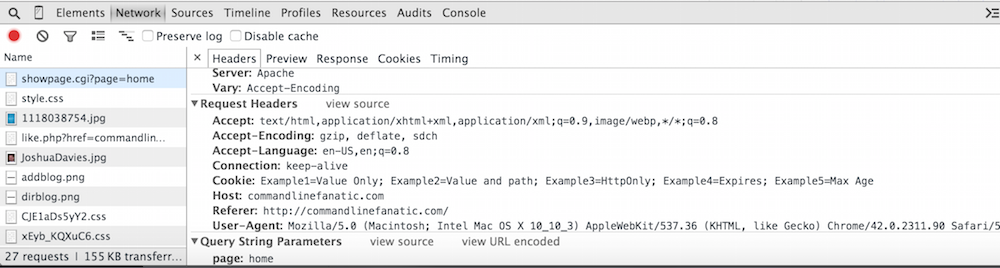
Figure 4: Cookies in request headers
Viewing local and session storage in the resources tab
Although cookies were the dominant means of associating state and data with web clients for decades and continue to find use in web applications,
they themselves weren't without their own flaws. For one thing, cookies are associated with
domain names and transmitted by browsers whenever a request was made to the corresponding domain.
It didn't take long before advertisers jumped on this coincidence and began taking advantage of it
to track users across multiple web sites. Although this was purportedly done to provide "better"
targeted advertising, it made a lot of users understandably nervous to have their browsing history
centralized this way. They began to demand — and received — the ability to disable
their cookies, so site administrators had to implement cookies alongside URL rewriting in order to
provide page personalization. With the advent of HTML5, the web has begun to offer page designers
a lot more flexibility in how they can safely and robustly (while still honoring their user's
privacy) store data on the client side. Mechanisms like Session Storage and
Local Storage are nearly ubiquitous now, and more and more page designers are
beginning to take advantage of them.
Session and local storage are similar in terms of how they're presented to the page author — the primary difference is that session storage disappears after the user closes the browser, whereas local storage persists across multiple restarts. Otherwise, both types of storage are simple key/value stores — you can insert new key/value pairs and retrieve the values associated with keys later. Example 2 is a simple use of local and session storage. If you open it and input the data shown in figure 5, you'll see those inputs reflected in the session and local storage areas in the Chrome debugger tools as shown in figures 6 and 7.
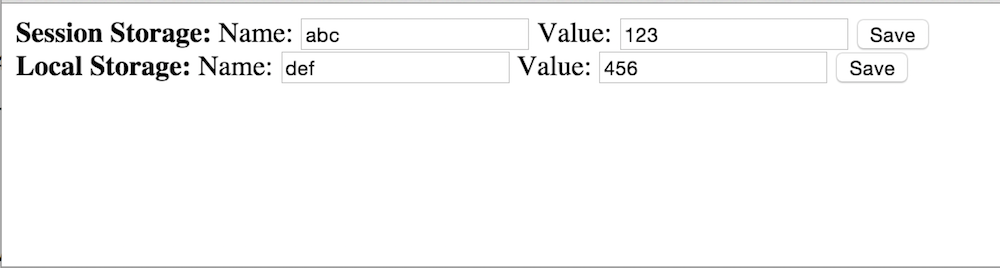
Figure 5: Storing some values in local and session storage
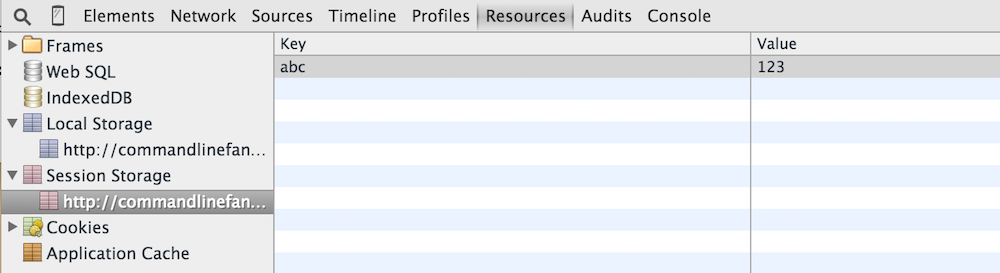
Figure 6: Viewing local storage in the Resources tab

Figure 7: Viewing session storage in the Resources tab
Now, if you shut your browser down, restart it, and navigate back to example 2, you'll see that local storage still shows the stored value, but session storage is blank as expected. However, if you simply navigate away and then navigate back without restarting your browser, the session storage values are retained — session values persist for the lifetime of the browser session. On the other hand, if you open an entirely new tab (or window) and navigate to the same page without shutting down the browser, you will see a new, completely independent set of session storage variables — sessionStorage is "tab aware" whereas cookies are not. Of course, one potential downside of using local or session storage is that it isn't, by default, accessible to the server, so you may be forced to move certain functionality into the client.
From the local storage resources tab view, you can add or edit local storage values; double-click an empty line to add a new one, double-click an existing line to edit either its key or its value. The (x) at the bottom of the screen allows you to delete a storage item — be careful, since there's no undo function! This is particularly important for page authors to be aware of — since the user can (easily) change or remove any local storage values, they should never be relied on for secure functioning (nor, of course, should cookies, which can also be modified, albeit with a bit more effort).
Note that session storage is meant to be segregated between multiple windows or tabs whereas local storage is stored long term and also shared among different tabs. This does introduce the possibility of conflict if two tabs are updating the same local storage entry concurrently. Therefore, the local storage standard allows pages to register to be notified of storage events that occur in other windows — example 3 updates example 2 to keep the local storage values in sync (note that there is no way, nor should you want or try to, keep session storage values in sync). If you open example 3 twice (in two separate tabs), any change you make in one will be shown in the other. Interestingly, as illustrated in figure 8, if you go to the resources tab and make a change there, that change will be reflected both on the other tab's page as well as in its own resources area.
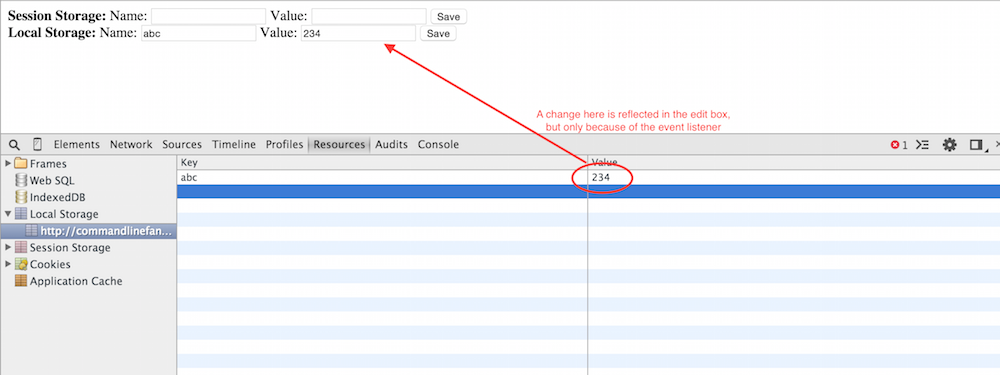
Figure 8: Keeping local storage values synchronized between tabs
Viewing Web SQL databases in the resources tab
Session and Local Storage are more Javascript-friendly forms of more traditional HTTP cookies — they manifest themselves as key/value pairs and don't offer the app developer a means of relating one to another automatically. In contrast, for more complex applications, HTML5 created the concept of client-side databases modeled after their successful server-side counterparts. The first such effort was the proposed Web SQL standard that was exactly like a traditional relational database such as Oracle or MySQL.
In spite of the fact that the Web SQL standard has been deprecated by the W3C, Chrome still has
pretty extensive support for it. I'll cover it briefly here since you might come across it, but
you shouldn't write any new functionality around it. Example 4
will create a web SQL DB when you click the Open button, executing:
Once you do, the database
appears in the
var db = openDatabase('testDB', '1.0', 'test database', 1024 * 1024);
Resources tab under the Web SQL drop-down as shown in
figure 10.
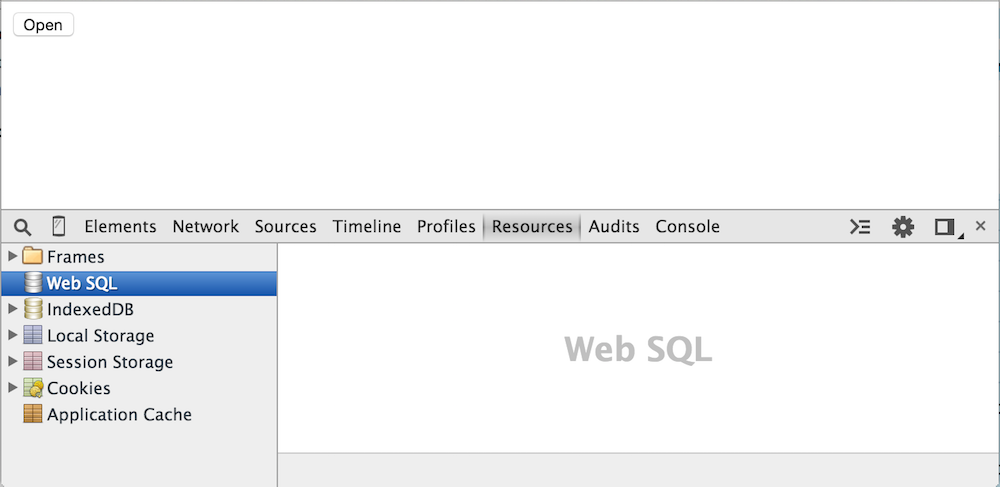
Figure 9: WebSQL view with no databases
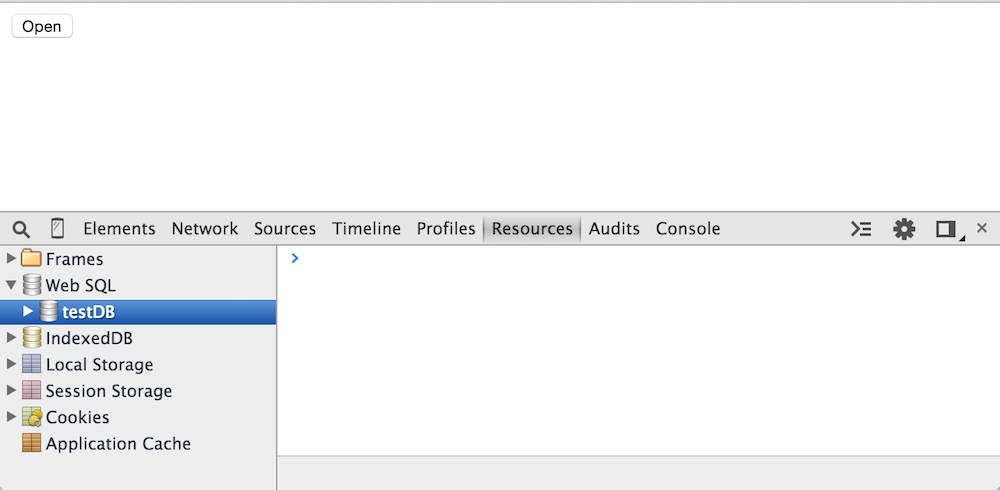
Figure 10: WebSQL view with one database
If you click on the newly created database, you'll be presented with a miniature console as shown
in figure 10. From here, you can execute SQL transactions and see their results right away.
So, for instance, type
to create a table with two columns. Now the table shows up in the list of database tables, but
is empty as shown in figure 11.
create table keyValueTable (key varchar, val varchar);
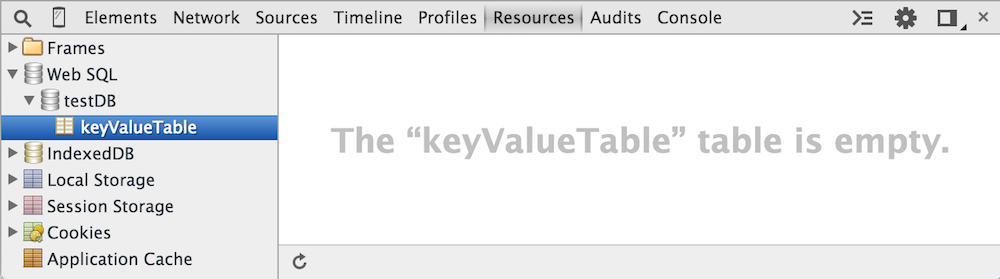
Figure 11: empty table
Navigate back to the console by clicking on testDB
again and type:
Now if you navigate back to the keyValueTable, you'll see the newly inserted data as shown in
figure 12.
insert into keyValuetable (key, val) values ('abc', 'xyz');
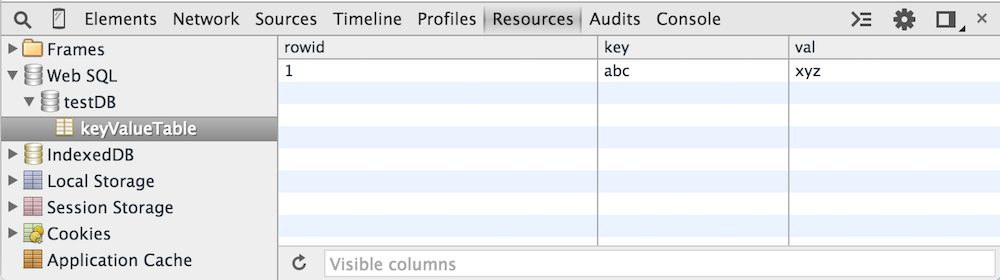
Figure 12: key value tale with one row
Notice that Chrome created a rowid column to act as the primary key
for your newly create table. If you had created a primary key (by marking one as
primary key in the create table statement), Chrome won't create one,
but you'll see it twice in the tabular view.
The tabular view doesn't offer much functionality of its own. You can refresh the data or limit
the visible columns using the controls along the bottom, but you can't edit or delete data — you can only do that via the
console using statements like
You can also run SQL select statements like the one shown in figure 13, below, and the result
will appear on the mini console.
delete from keyValueTable where rowId = 1;
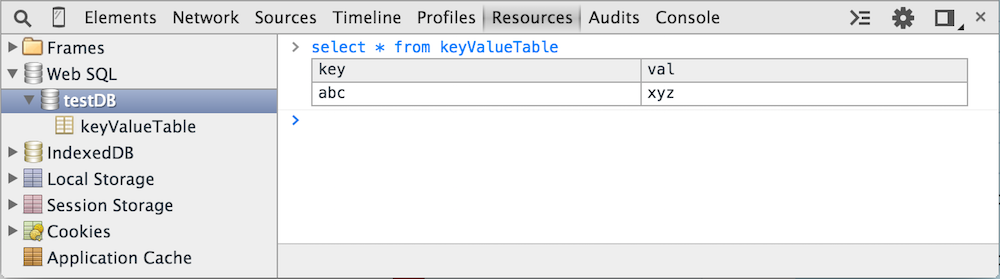
Figure 13: select statements in the webSQL console
You may have noticed that the webSQL console autocompletes for you, which can come in handy if
you've forgotten your SQL syntax. Everything that you type into the mini-console will be
interpreted as though it were:
Which is how web sql was intended to be performed before it was deprecated by the W3C.
transaction.executeSQL(<whatever you typed>);
If you close the browser, navigate back to example 4, and bring up the resources tab, the
WebSQL line will be empty. If you click the Open button again, however,
triggering the line:
the database will reappear, including all of the data that you inserted previously. You won't
see it in the resources tab until you reopen it, though.
var db = openDatabase('testDB', '1.0', 'test database', 1024 * 1024);
Viewing Indexed databases in the resources tab
So I mentioned that the Web SQL standard is deprecated and shouldn't be used — so what
should you use if you have storage needs that are a bit more complex than the simple
key-value pairs that local storage permits? HTML5 also introduced the IndexedDB
standard, which is well supported, especially in Chrome. Example 5,
illustrated in figure 14, will create and populate an IndexedDB in response to
button clicks.
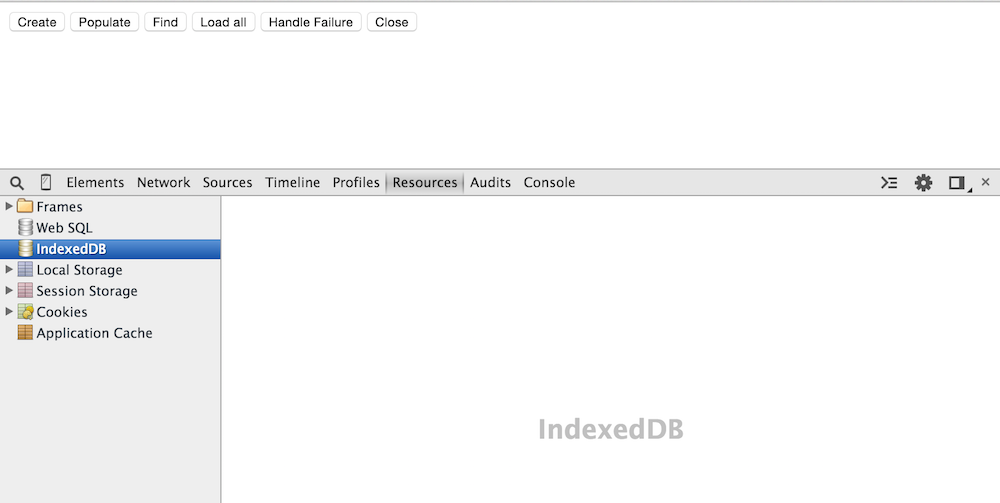
Figure 14: IndexedDB view with no databases
Initially when the page is loaded, no database has been created; click the Create
button and a new database will be created using the code:
However, you won't be able to see it initially; the resources tab isn't dynamic this way (at least
not where IndexedDB's are concerned). Right click and select "Refresh DB" as shown in figure 15.
var request = indexedDB.open("testDB");
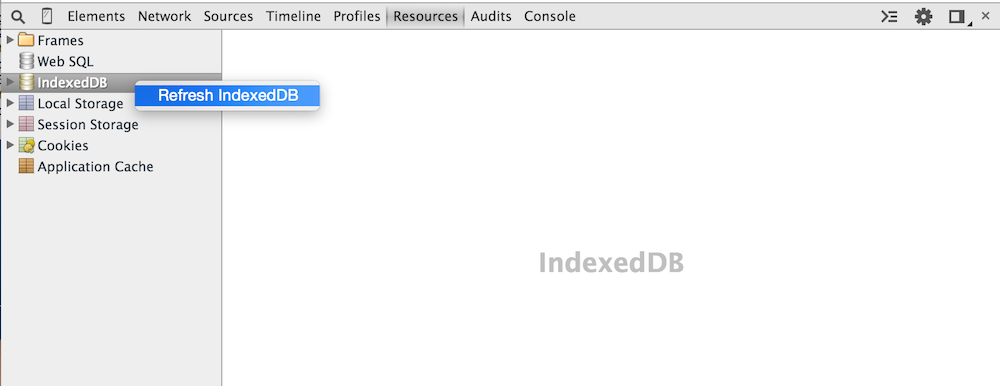
Figure 15: Refresh IndexedDB
Now you see that the database has been created along with two empty tables (names and columns
courtesy of the WWW specification on IndexedDB). These two tables were created after the database
was opened via:
Note that this code is only run the first time you create the database (e.g.
	request.onupgradeneeded = function()	{
		var db = request.result;
		var store = db.createObjectStore("books", {keyPath: "isbn"});
		var titleIndex = store.createIndex("by_title", "title", {unique: true});
		var authorIndex = store.createIndex("by_author", "author");
	};
onupgradeneeded) to create a new table. You can see the details now as shown
in figure 16.
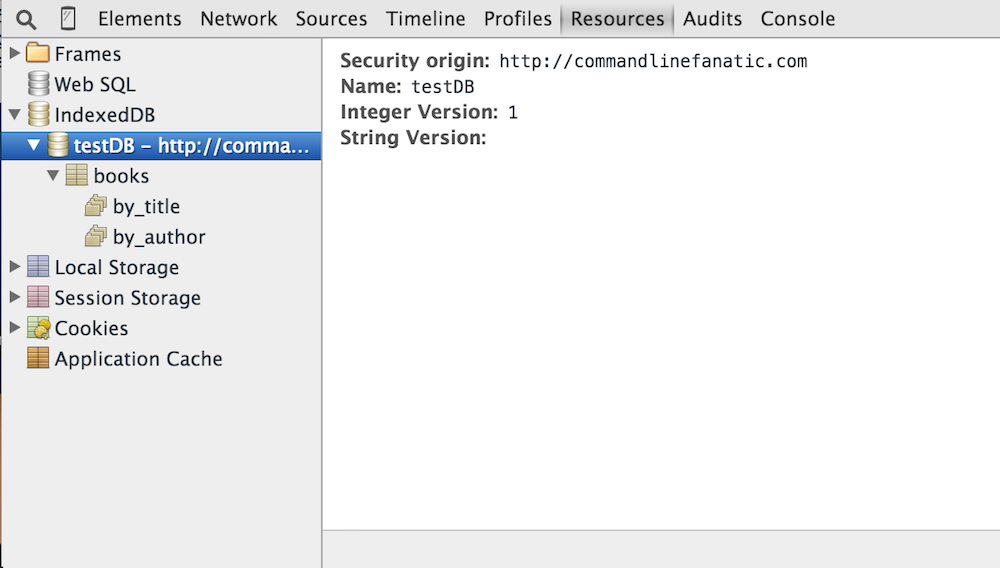
Figure 16: IndexedDB database metadata
This DB is associated with every page in the commandlinefanatic.com domain — you can verify this by navigating to any other page on this site. The table has two indexed columns, shown in figure 17 — it's up to the database creator to optimize it by indicating which columns should be indexed.
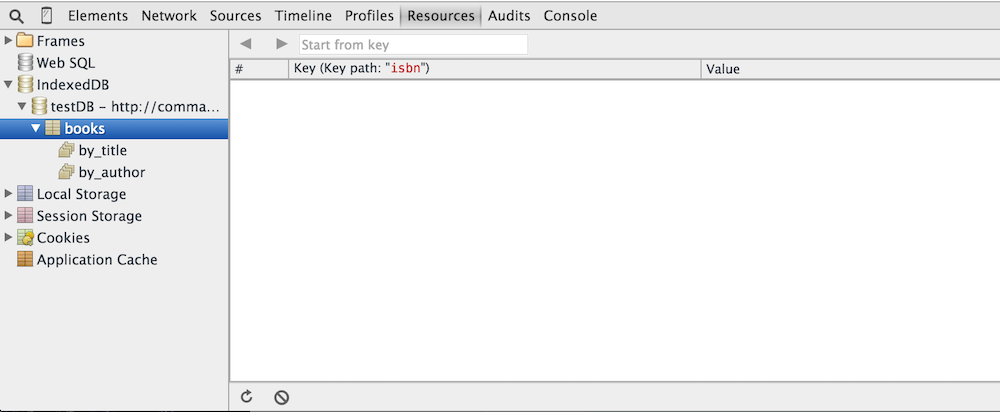
Figure 17: Empty table with two indices
If you now click the populate button, data will be inserted into the database using:
Note that, in order to see this, you have to click the refresh icon at the bottom of the table
view, not the
	var tx = db.transaction("books", "readwrite");
	var store = tx.objectStore("books");

	store.put({title: "Quarry Memories", author: "Fred", isbn: 123456});
	store.put({title: "Water Buffaloes", author: "Fred", isbn: 234567});
	store.put({title: "Bedrock Nights", author: "Barney", isbn: 345678});

	tx.oncomplete = function()	{
		console.log("population successful");
	};
Refresh IndexedDB context menu item that you used in figure 15.
Like the WebSQL view, you can't edit the values or insert new ones from this view. You can
do simple searches and page back and forth over a large volume of data, though, since there's
no equivalent of the select statement here.
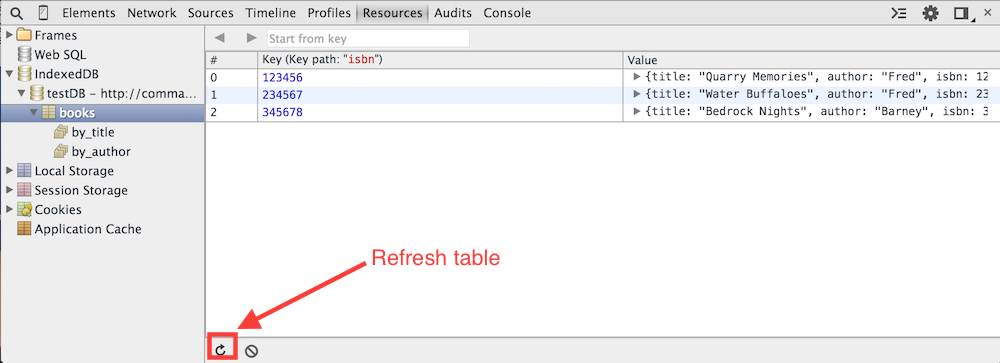
Figure 18: Populated table
The indexes themselves can be viewed in order as well by clicking on them. Again, you'll have to click the refresh icon before you see this, even though it's populated.
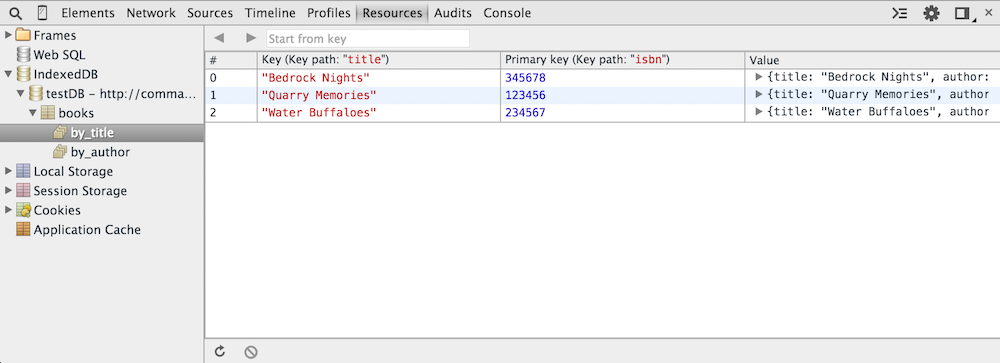
Figure 19: Populated index
Interestingly, if you close the browser and navigate back to this page, you will see this IndexedDB, along with all of its data, in the resources tab. This is in contrast to the WebSQL handler that only shows you the database after it has been opened by one of the pages.
Application Cache
As I mentioned in the introduction, HTML 5 represents a shift in thinking about the web from
pages to applications. The HTML5 Application Cache makes this shift complete by
allowing a web application to declare to the browser that it should be downloaded in its entirety
and served from cache permanently from that point on. In this way, a web application like a word
processor or a spreadsheet can remain functional while it doesn't have a network connection (such
as on an airplane). Web pages have always been cached, but the web application cache allows the
page/application author to be explicit about exactly what should be cached and how.
Example 6 is a bare-bones "application" with some cached pages. The
cache control is declared in the HTML tag as:
This is a reference to a
<html manifest="art039ex6.appcache">
cache manifest file:
If you open this example in another tab and navigate to the application cache view as shown in
figure 20, you'll see a summary of the manifest file in tabular form. The application cache
has three categories of entries:
CACHE MANIFEST
# v1 - 2015-04-27
http://www.commandlinefanatic.com/art039ex6.html

NETWORK:
art039ex6_net.html

FALLBACK:
art039ex6_preference.html art039ex6_fallback.html
Master, Network and Fallback.
Master entries will always be retrieved from cache, even if you're online.
Network resources are the opposite — they'll never be loaded from cache, and
won't be available in offline mode. Fallback entries are a sort of hybrid: if you're
online, the first entry will be retrieved; if not, the fallback will be presented instead.
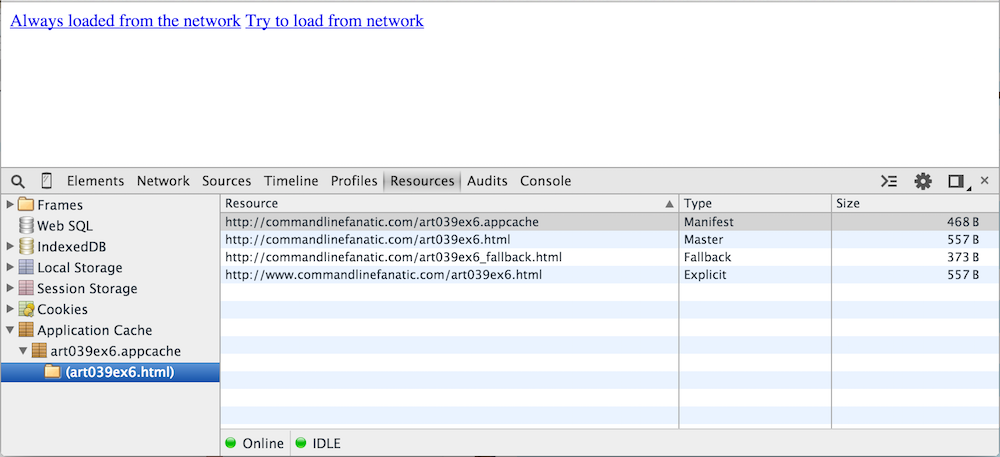
Figure 20: Application Cache View
If you want to see a summary of all of your offline applications, you can visit chrome://appcache-internals as shown in figure 21 below.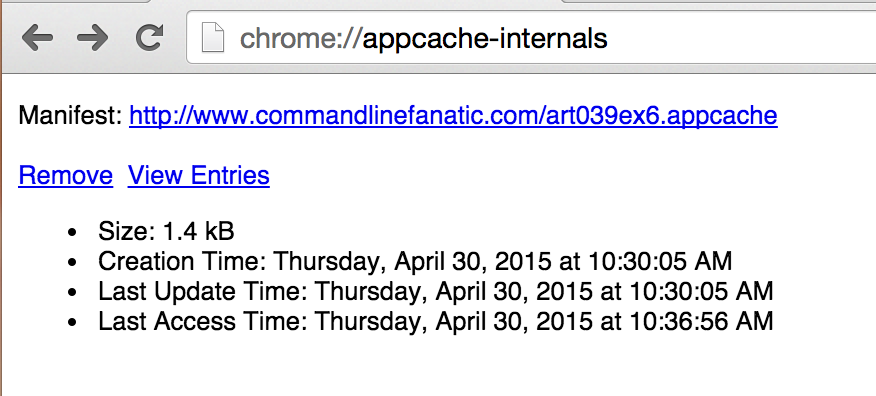
Figure 21: Appcache internals
Frames
Last but not least is the Frames view. Although it's at the top of the resources
tab, it almost feels out of place next to so many advanced, shiny new HTML 5 additions. The
frames view of Example 7 illustrated in figure 21 provides you a list
of all of the "standard" parts of a web page/application — the HTML, CSS, Javascript, images,
web fonts, etc. that are downloaded to provide a page to display. This will always be present
and have at least one entry, since you need at least an HTML page in order to show something in
a browser.
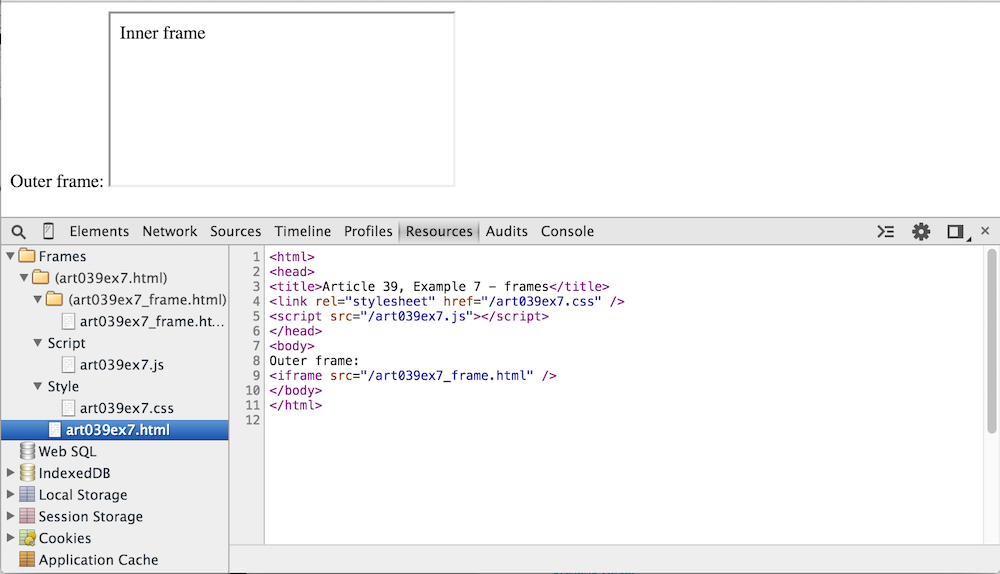
Figure 21: Frames View
For the most part, the frames resource view provides a rehash of the information
from the Network tab, but gives you a more "after the fact" view of how the page
is structured. If the page includes any embedded iframe elements, they'll be
separated out as shown in figure 22.
If you have a page with traditional frameset elements, they'll also be separated
this way. Hopefully you'll never need to know this, though, since framesets
have been deprecated for a very long time.
Add a comment:
Completely off-topic or spam comments will be removed at the discretion of the moderator.
You may preserve formatting (e.g. a code sample) by indenting with four spaces preceding the formatted line(s)